I am from Kanhangad a small town in Kasargode, Kerala, India.. many may not have heard about this place and hence the hierarchy. We have bekal Fort close to us, Nithyanda swami’s samadhi place and a town that still stays the way it was 30+ years ago. My breakfast most days will be either dosa sambhar, idly, uruliyappam, ariyuppumavu or neer dosa when in my home town. I love the days when it is neer dosa :), I feel it is the most purest form of breakfast, second comes pongal for me. In Malayalam I like to use the term nairmalyam. It is the least complicated dosa, but the most satisfying. It is so delicate and can be called as soul food. People in Manglore can relate to the feeling.
Lot of curries, chutneys will go with it very well. The best combo is when you apply a bit of ghee on top of the dosa in tawa when it is done cooking and sprinkle the sugar on top. Roll like masala dosa and have it hot from tawa.
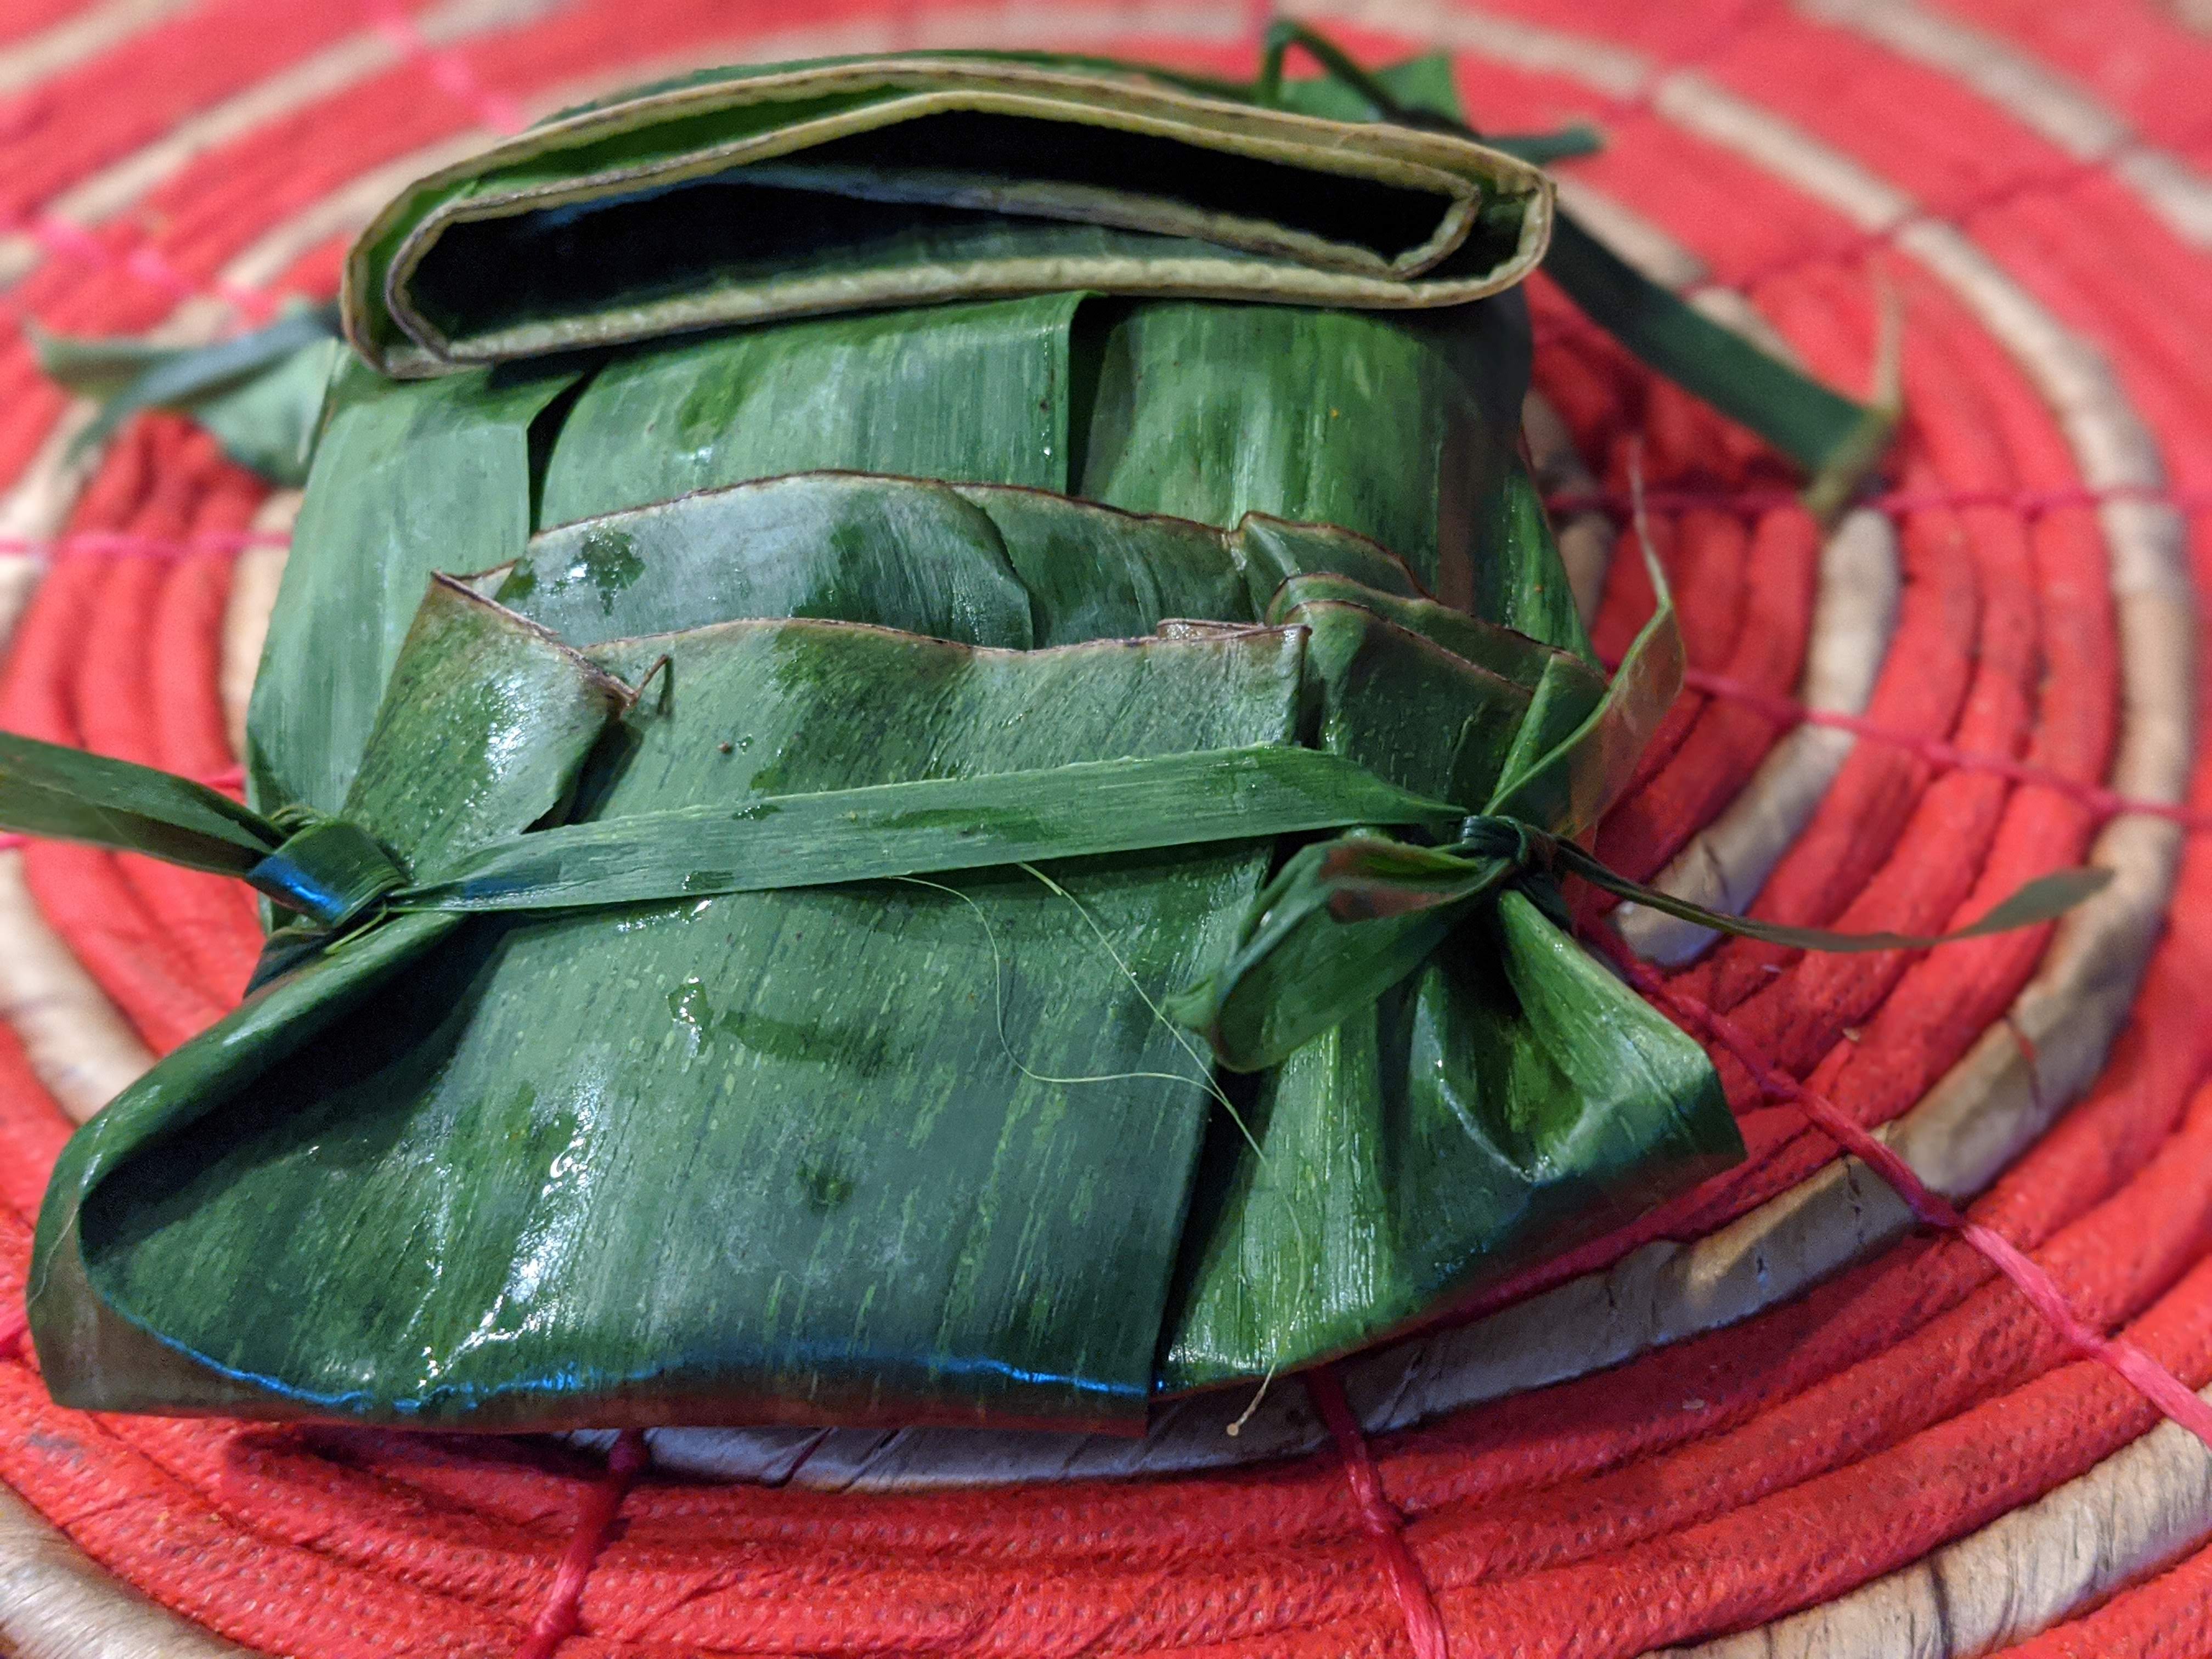
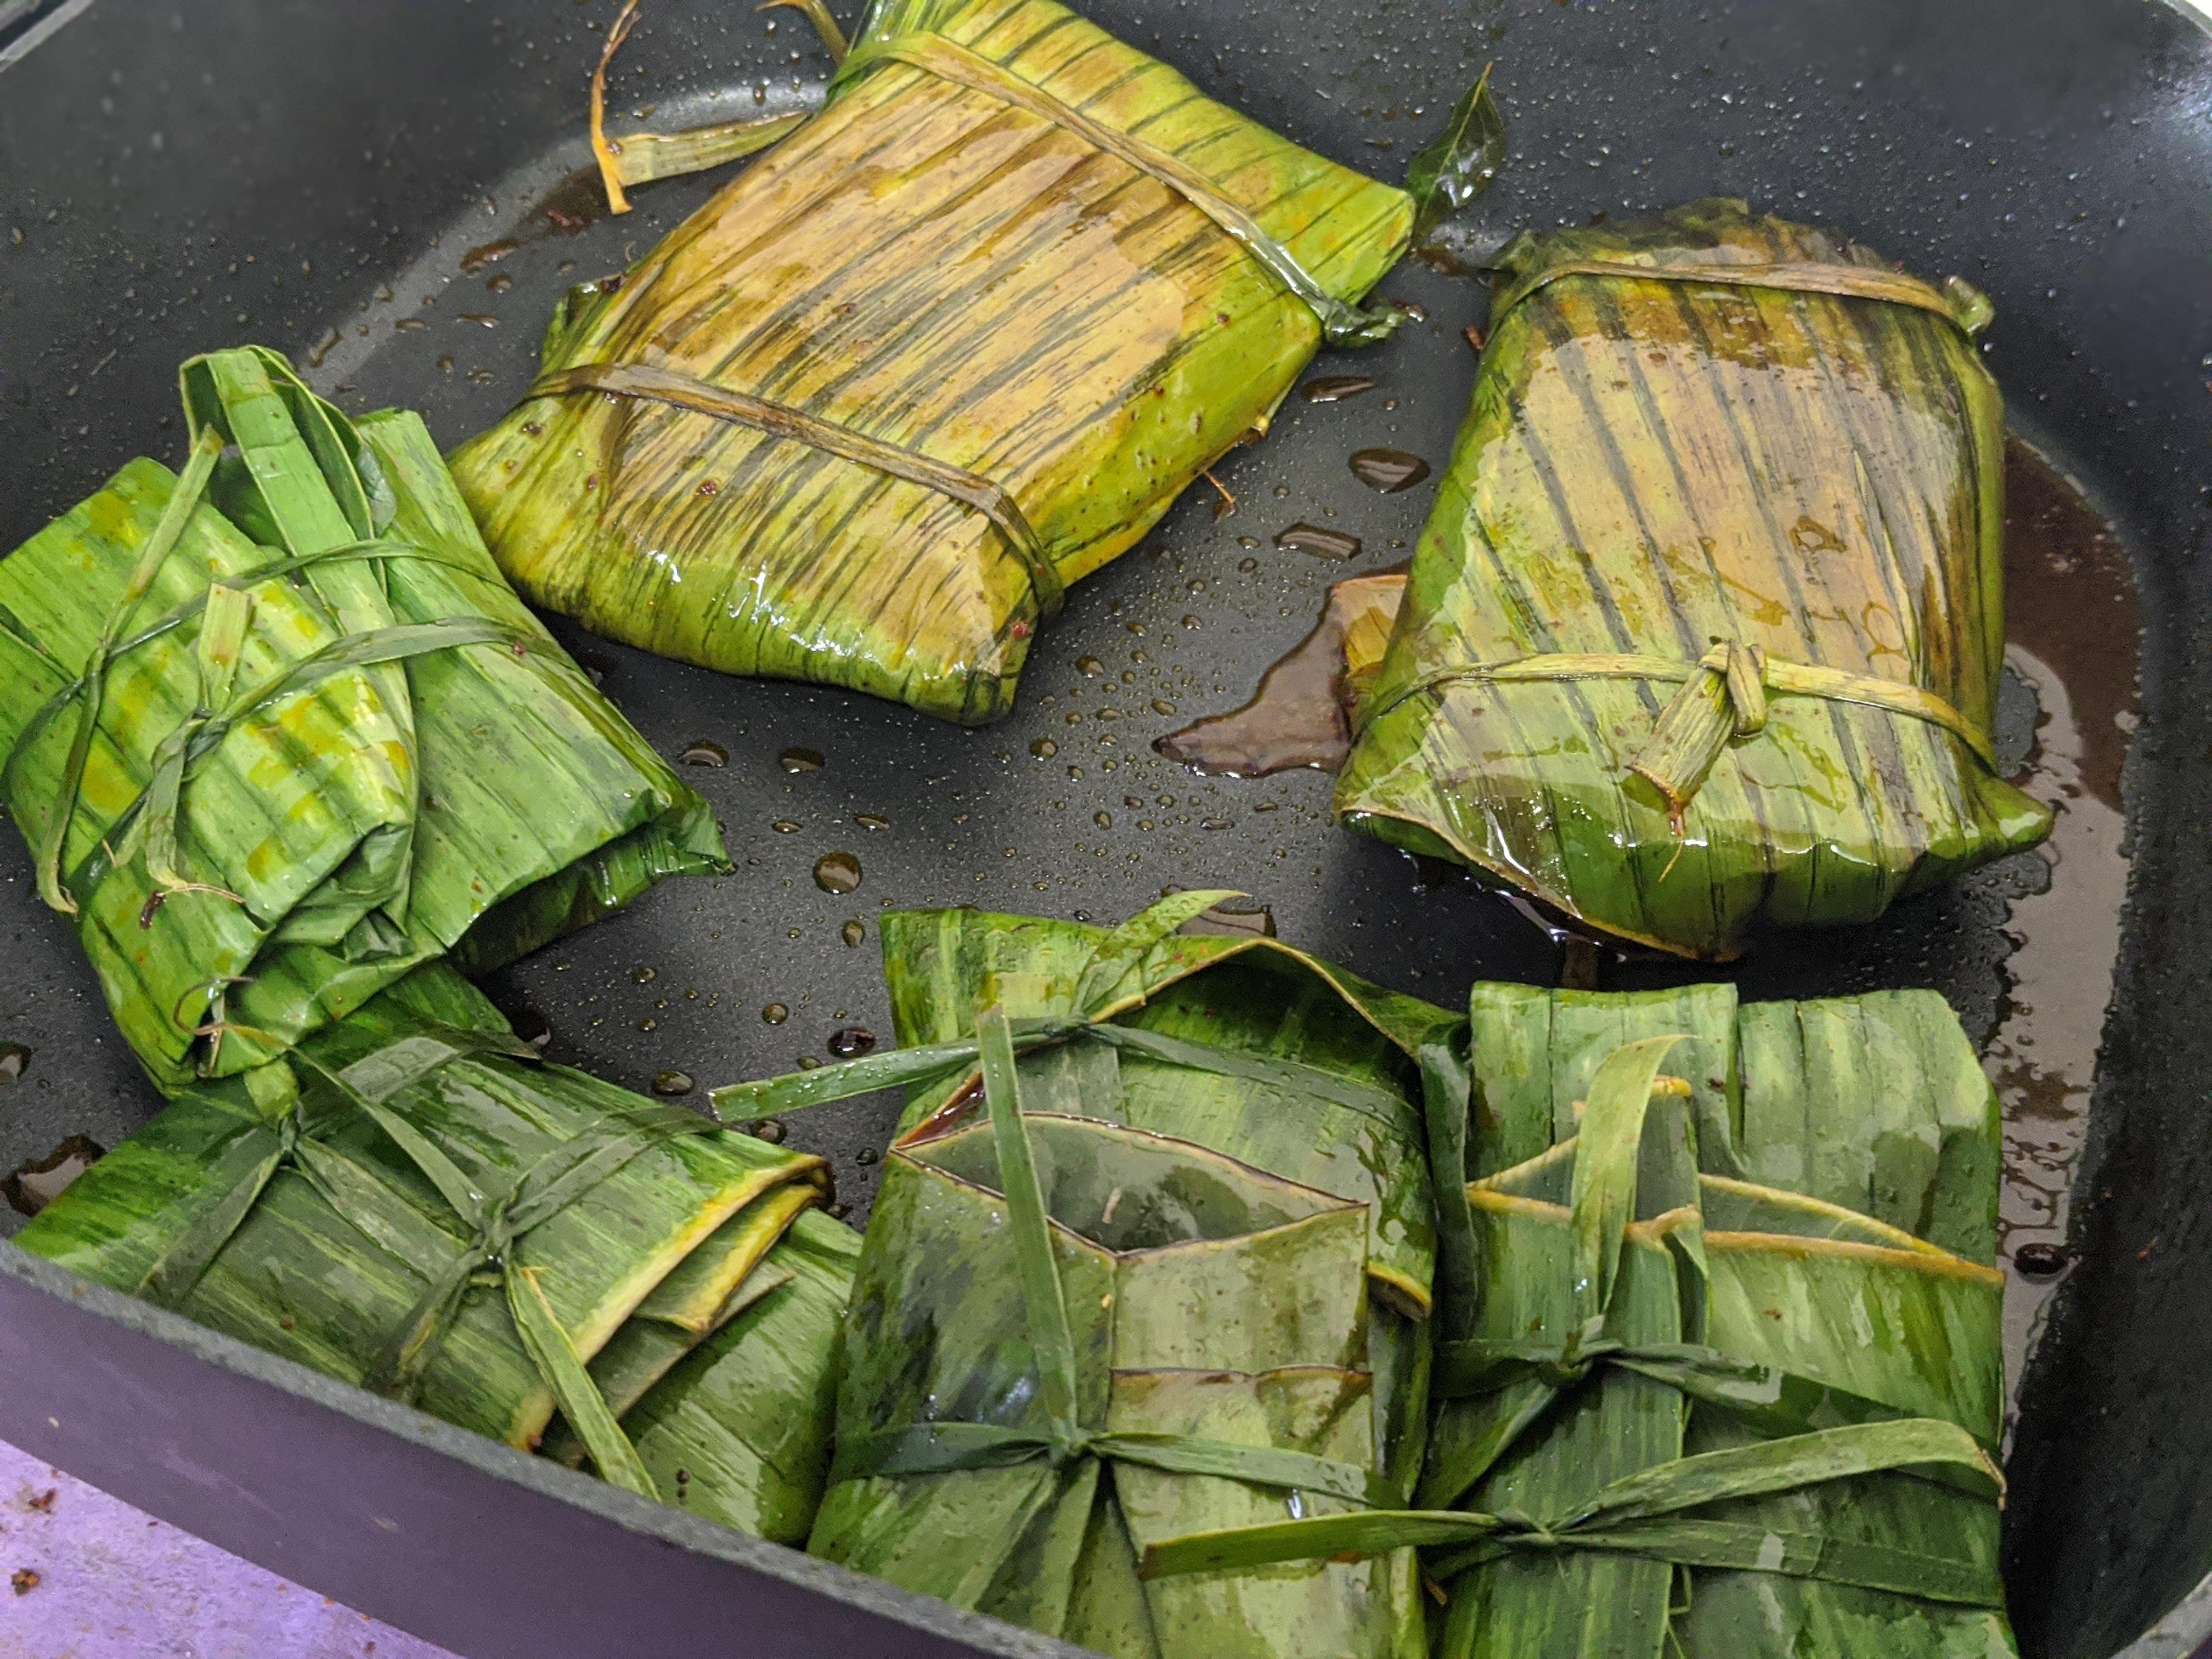
One Friday during these days we tried combo of neer dosa with meen pollichathu and was a super hit at home.
Neer Dosa
Neer Dosa
Raw rice( Sona Masoori/Biriyani Rice )- 3 cups Coconut milk or Coconut If coconut milk – 11/2 cups If grated coconut – 1 cup Water – 1 cup Salt – As needed
Grind rice, coconut and water together to a nice paste and add salt as needed.
The consistency should be watery than dosa batter and when you pour on tawa it should be spreadable or flowing in the tawa.
On the tawa (cast iron is the best) pour the batter and try to rotate tawa and have it as thin as possible.
Cover the tawa and wait for a minute, the dosa should be cooked. Do not flip the dosa, just take it out and enjoy it when its hot.
You can apply ghee when its on tawa and sprinkle sugar and that will make a nice dessert ending for the meal :).
Grind all the ingredients below with enough water to form a marinade except 1 sprig of curry leaf
Chili powder – 2 tbsp
Pepper powder – 2tbsp
Turmeric powder 1tsp
Ginger – 2 inch
Garlic 1 bulb – 6-7
curry leaves – 2 sprigs
shallots – 2-3 small ones
Salt – as needed
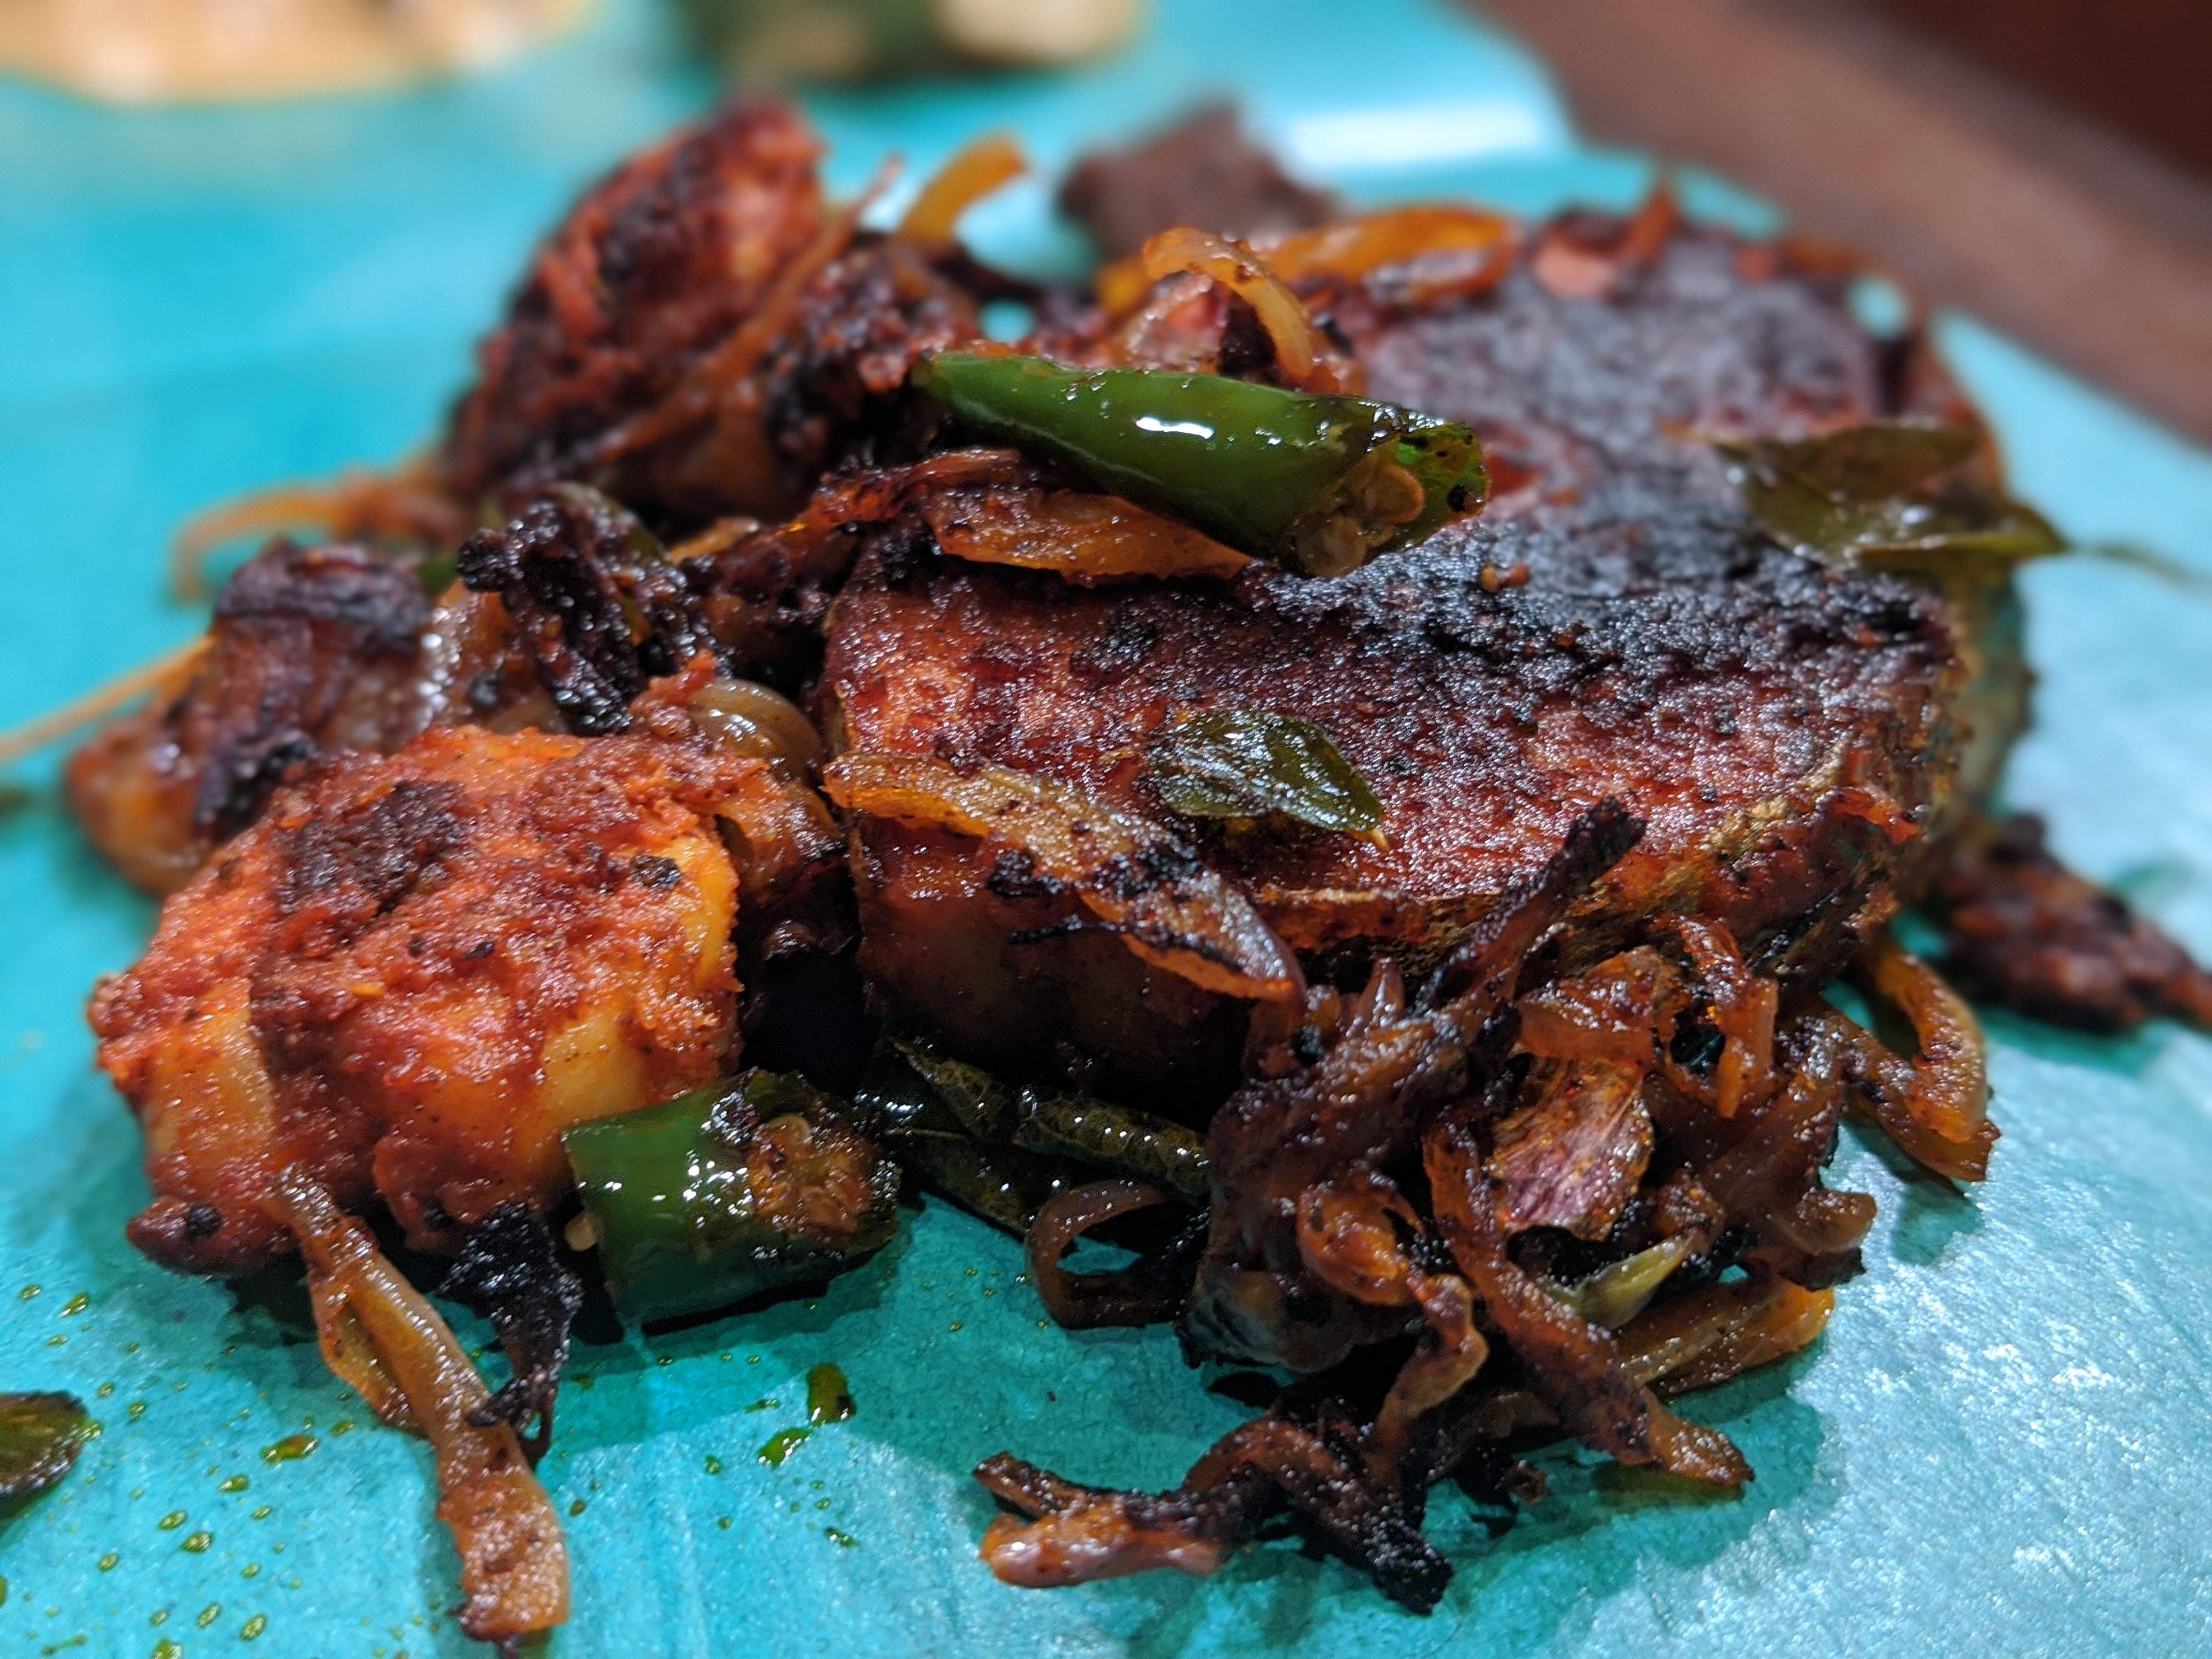
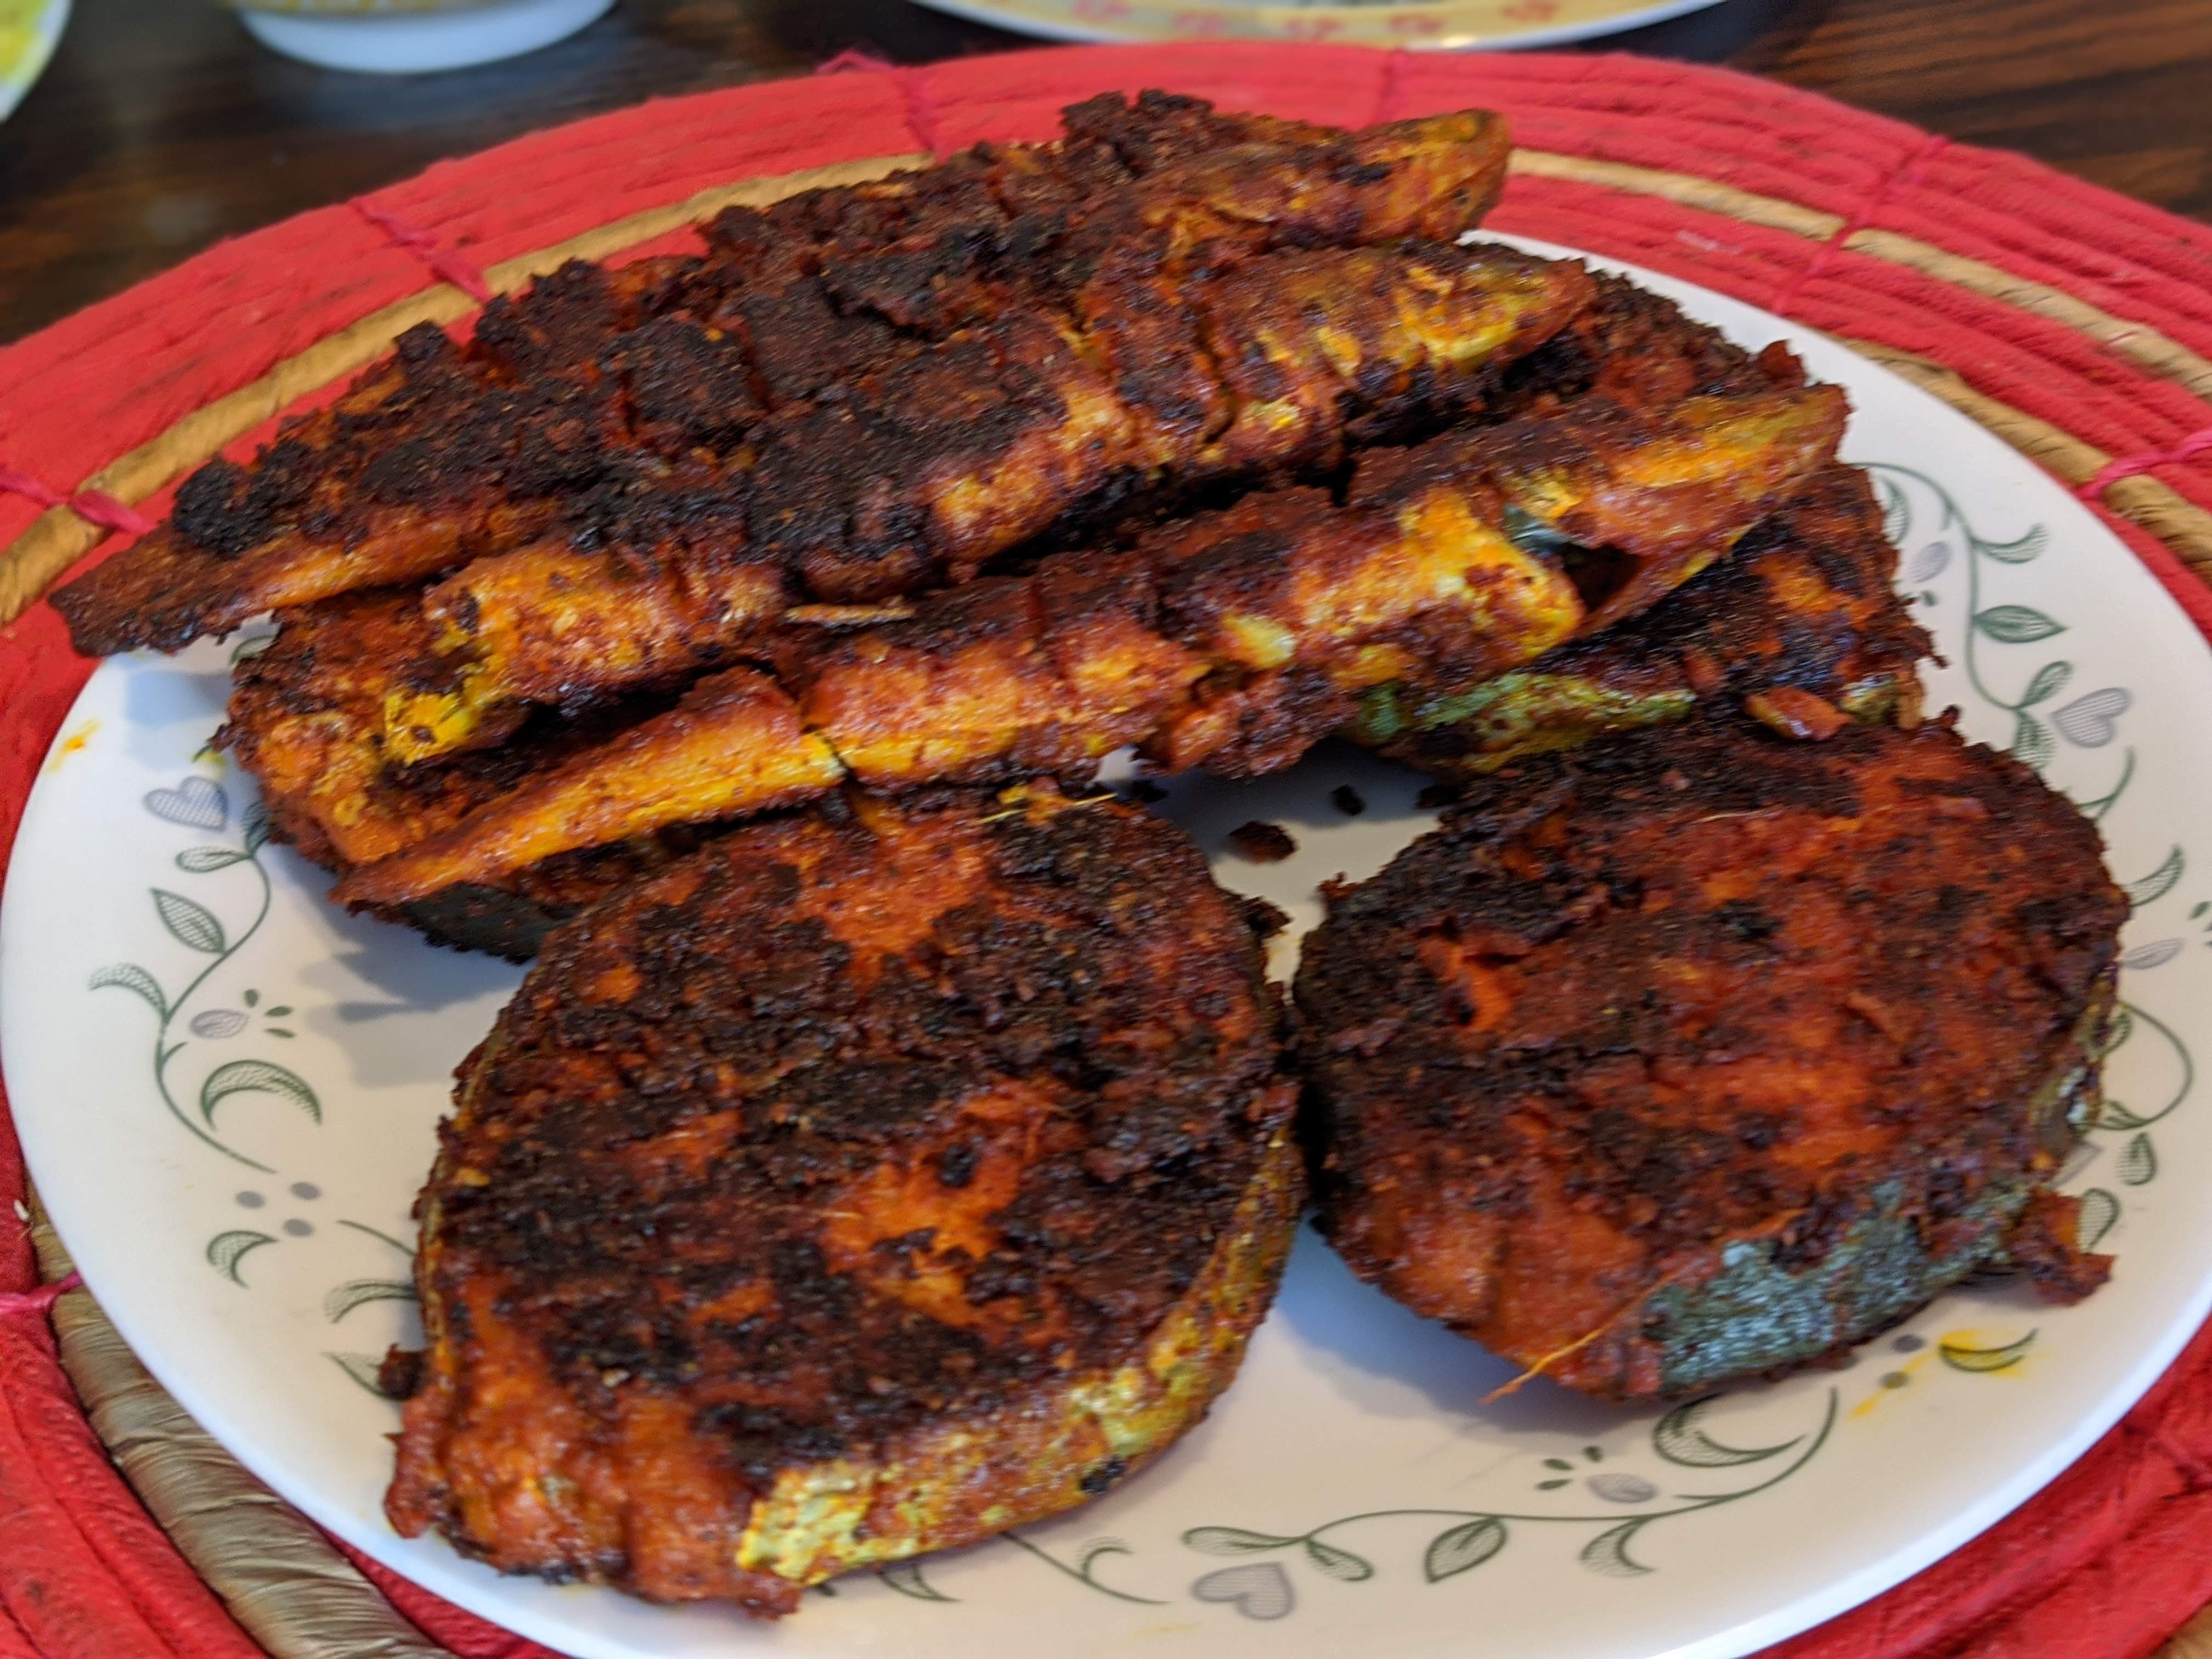
Apply the rasa koottu to the clean fish. Add salt as needed. Keep it for 30 minutes if possible, if not 10 minutes is good too.
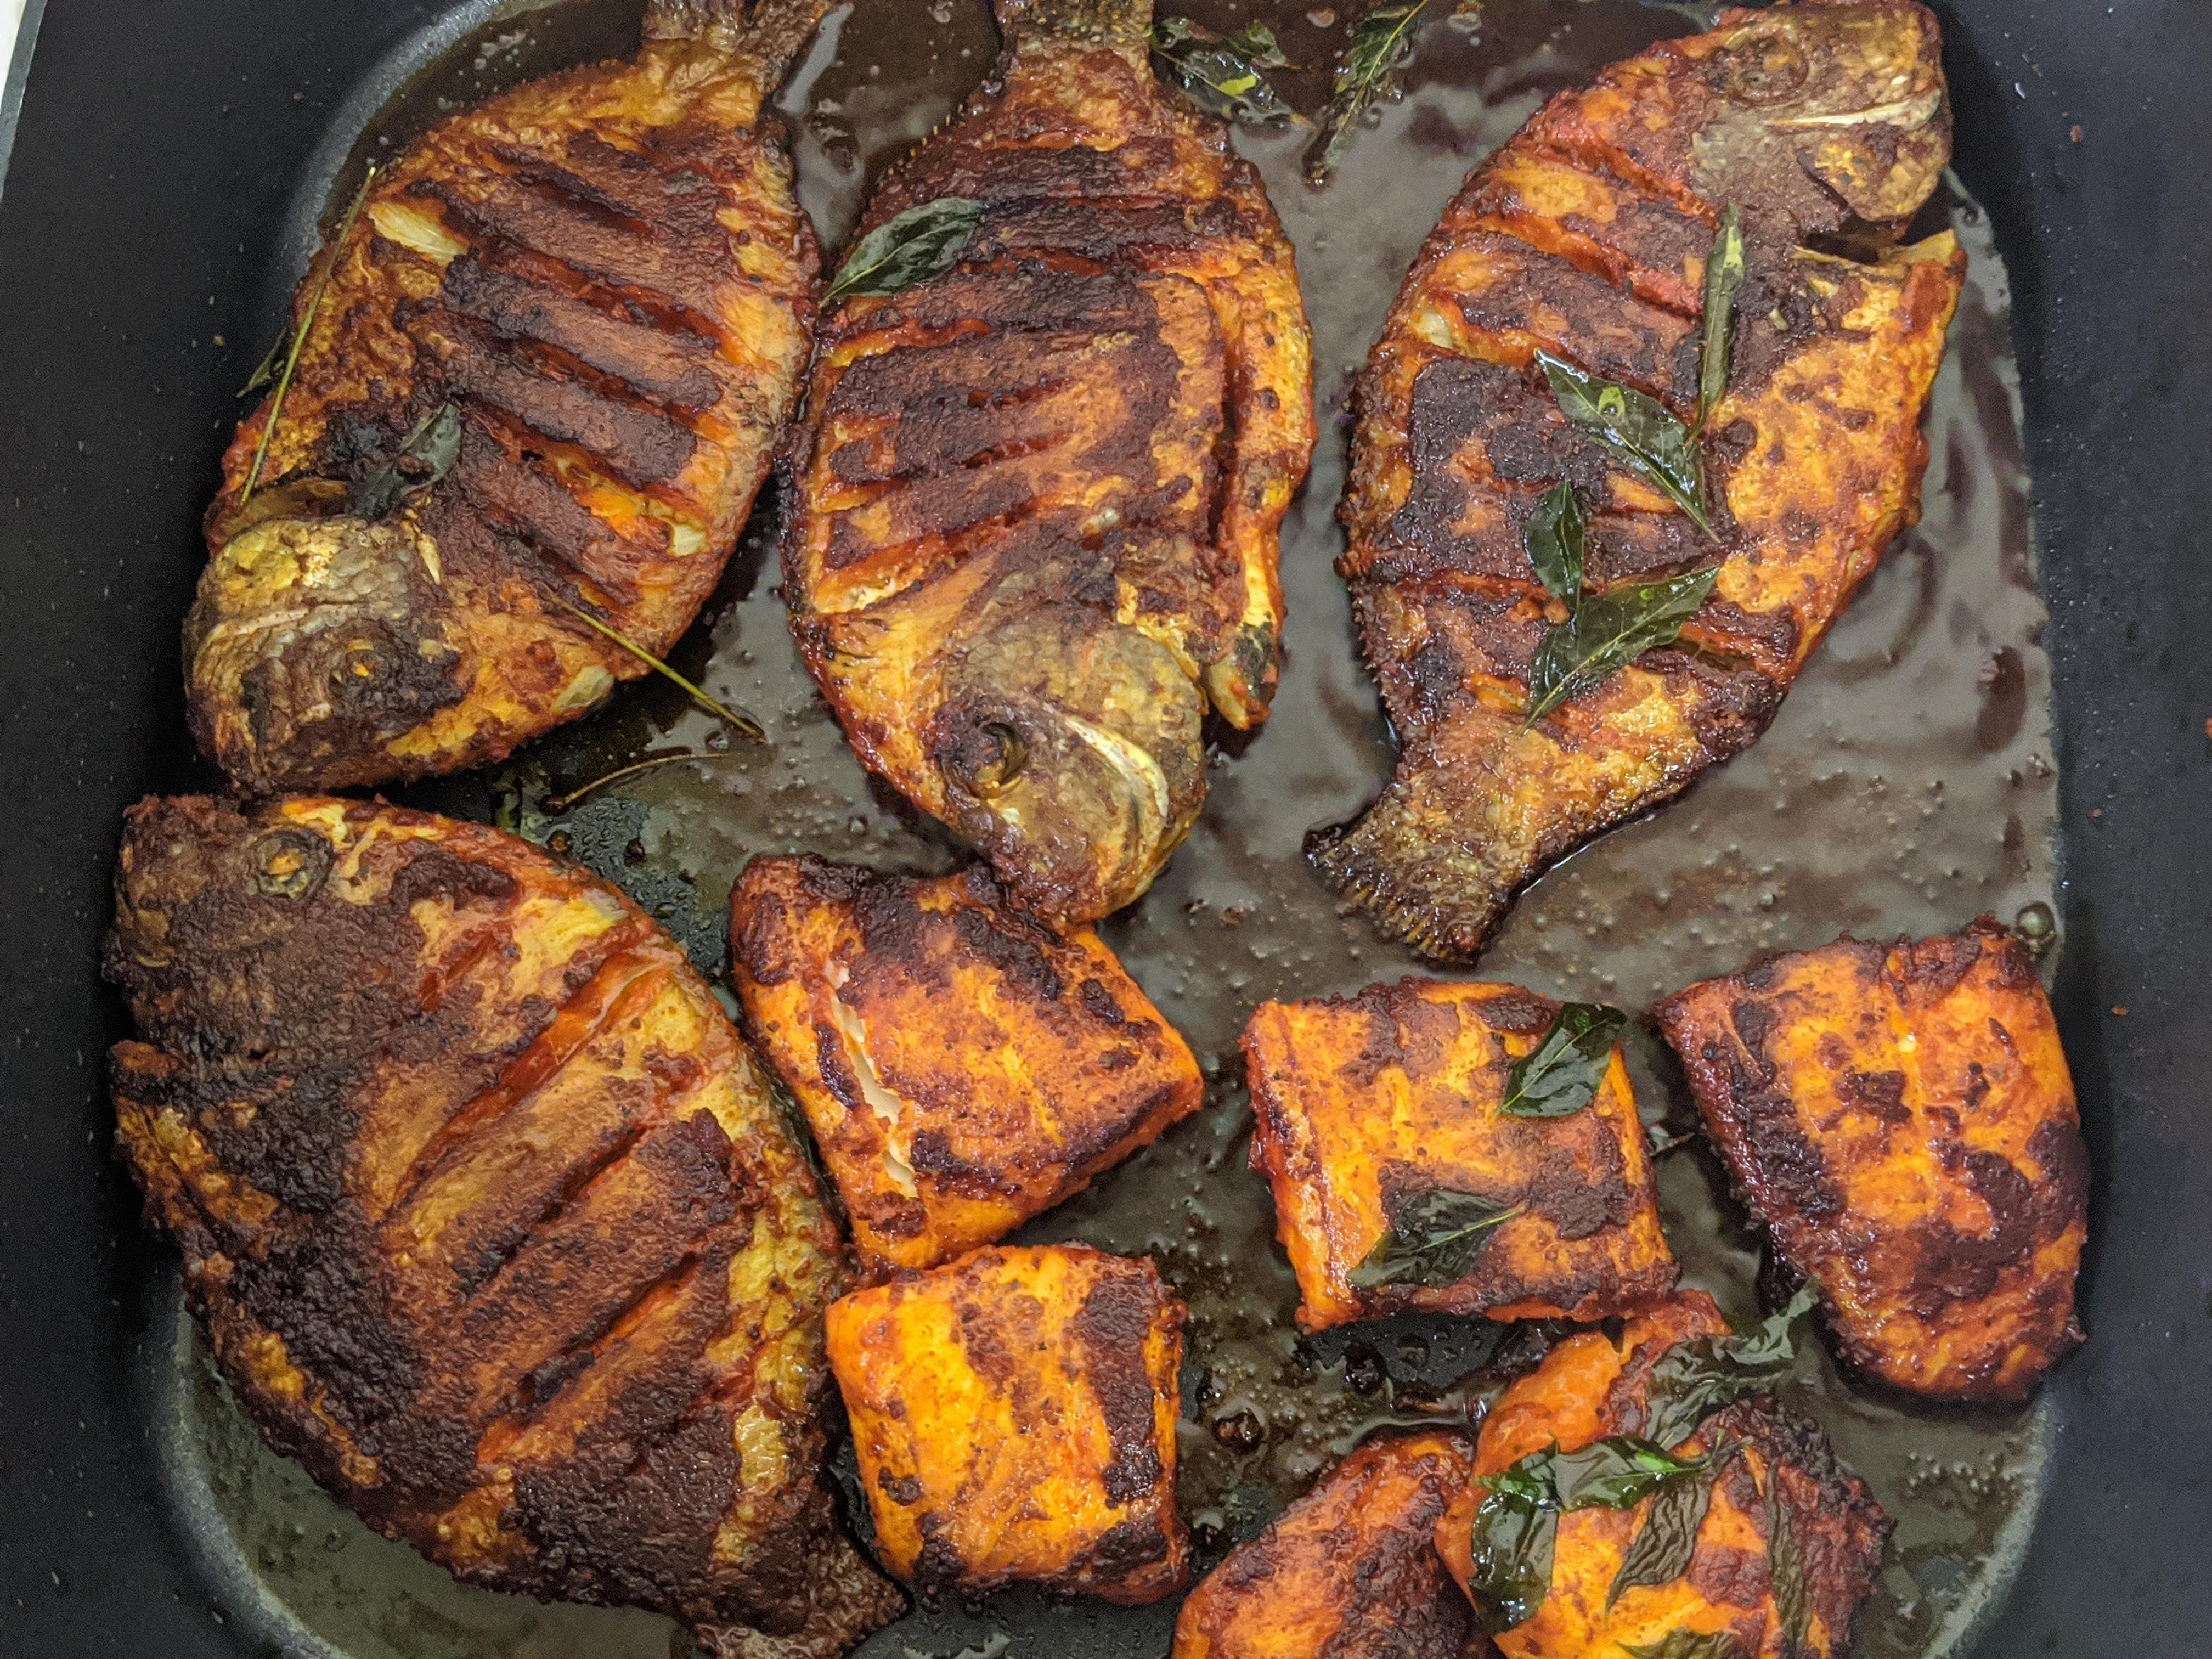
Heat the tawa and place the fish one by one and fry as per your taste. I love it crispy outside and juicy inside. My daughter loves it crispy. You can do it as you love. Best to shallow fry it and not go too crispy to the burned taste.
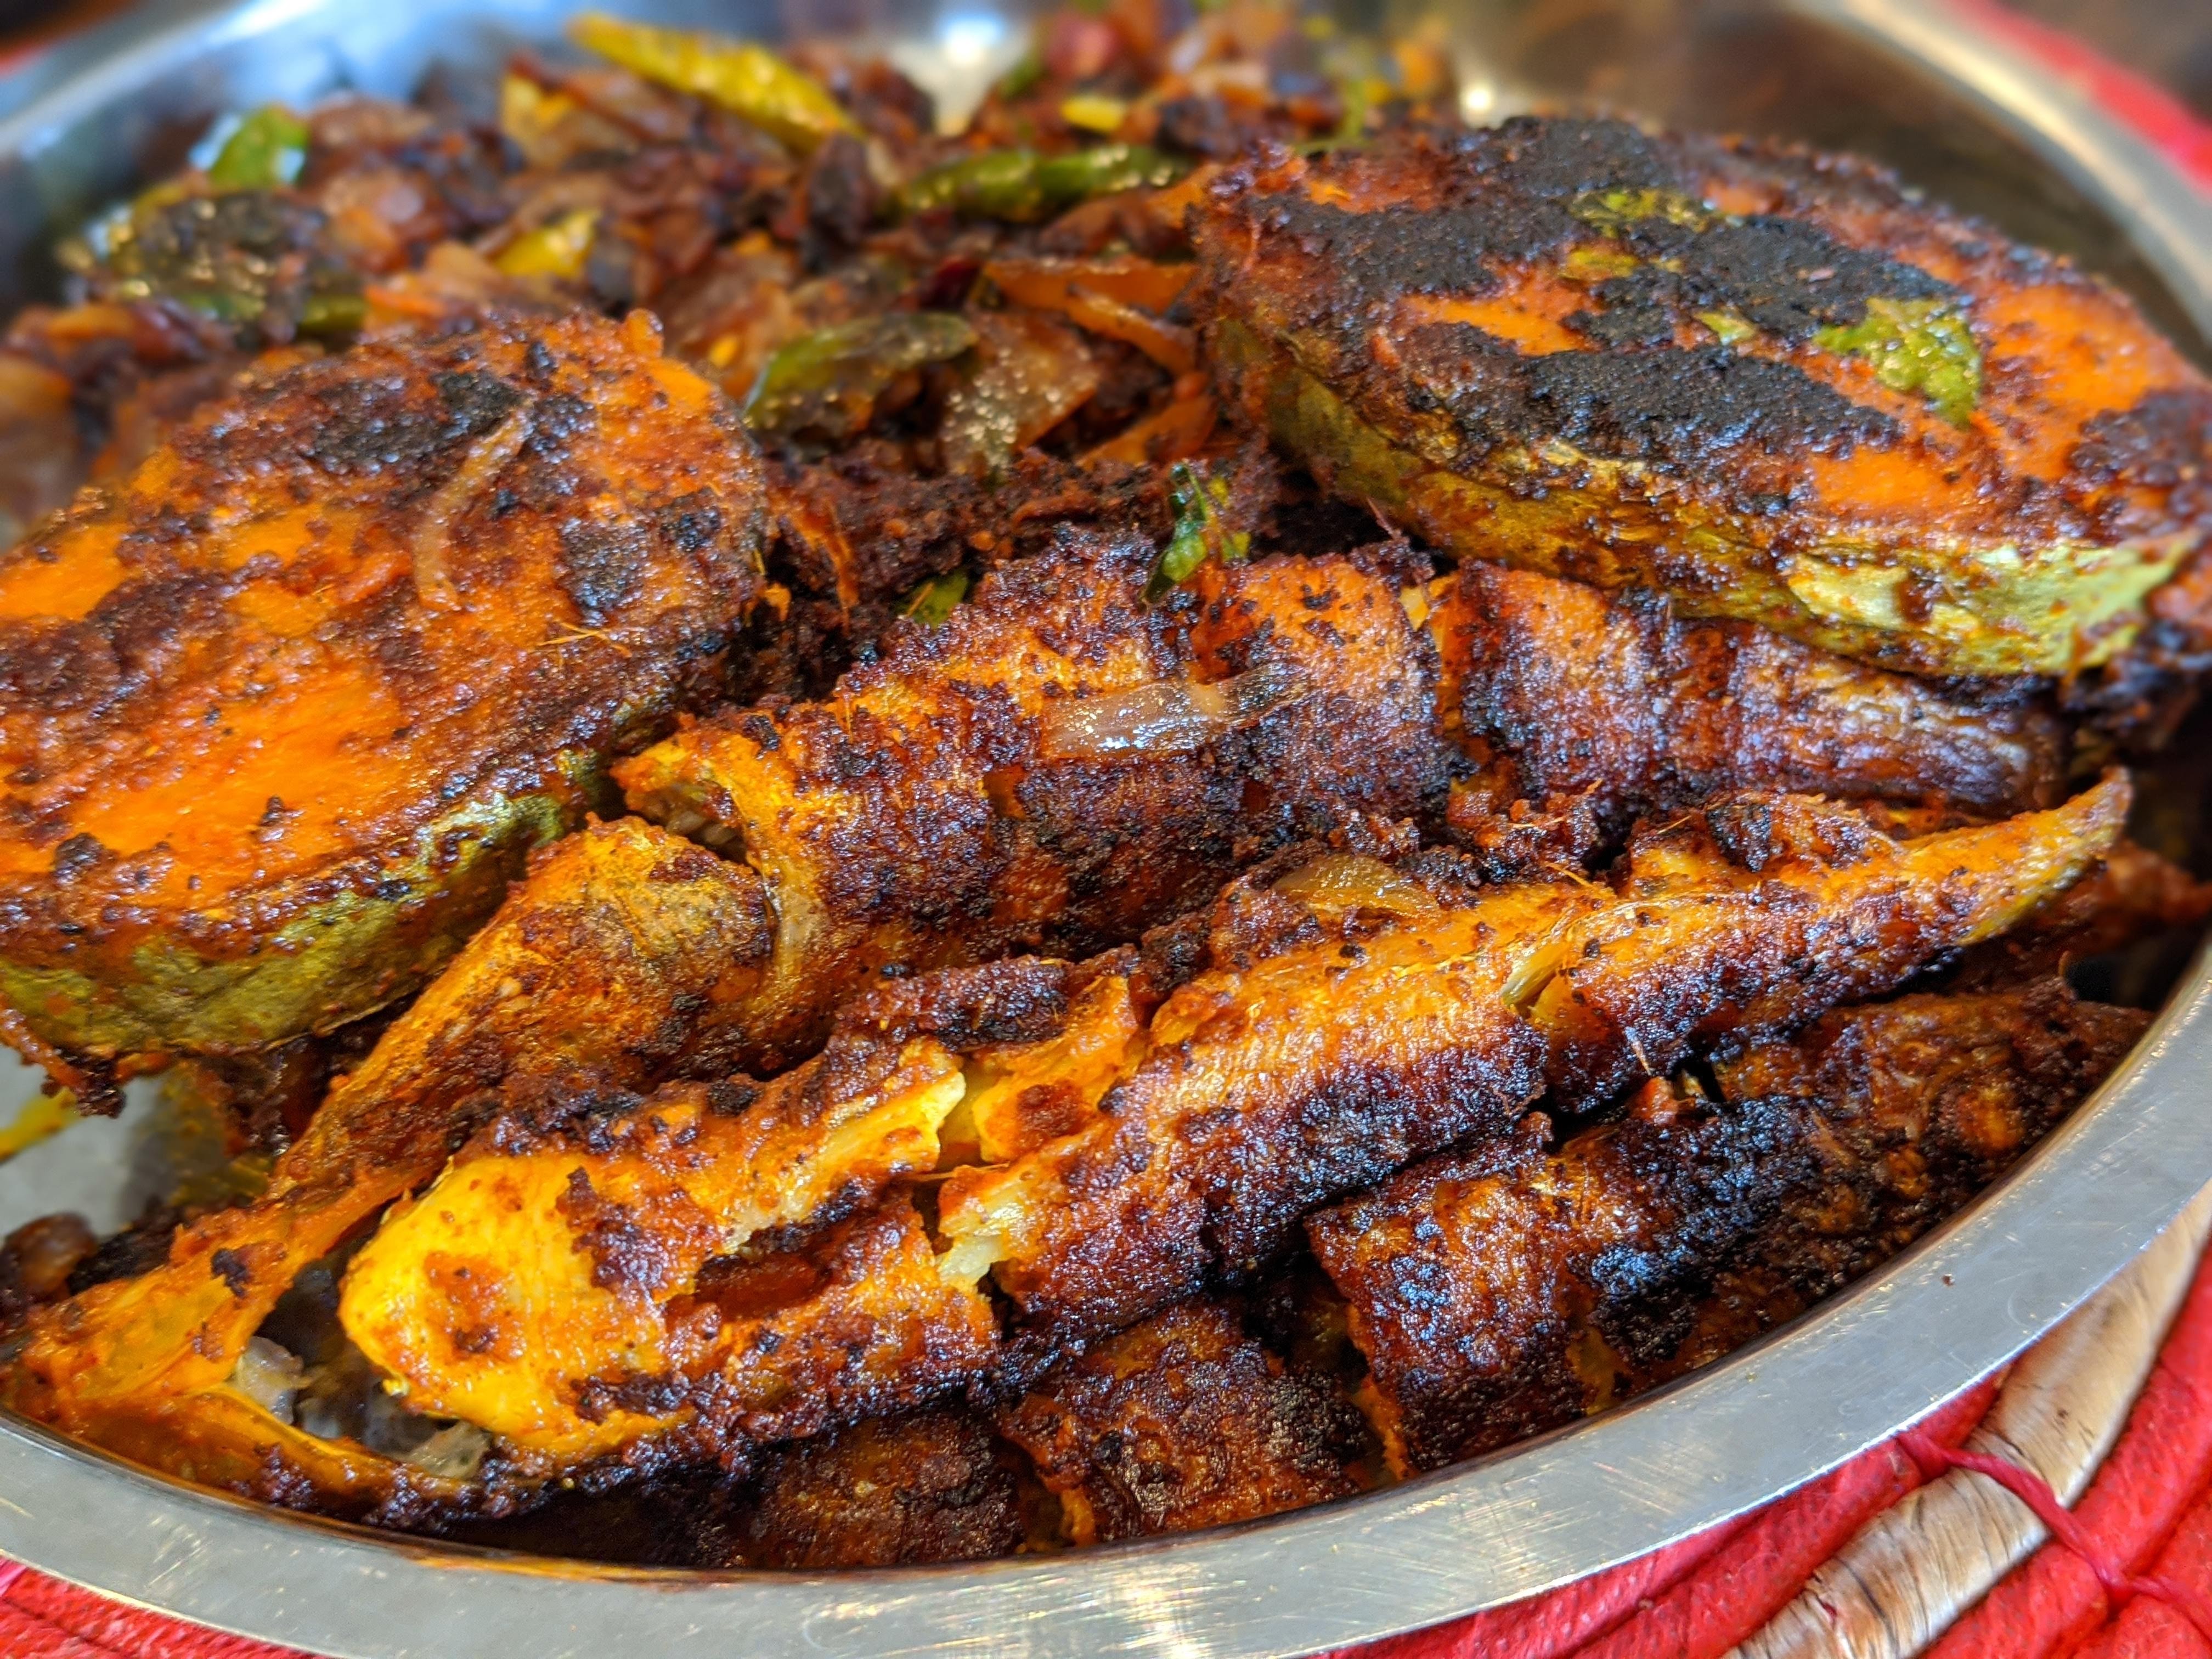
Cut a medium onion and 3- 4 green chilies. Add the onion and chilies to the same marinated left over and shallow fry it after fish and add the last sprig of curry leaf too. The smell of that fish with all the marinade will invite people home.
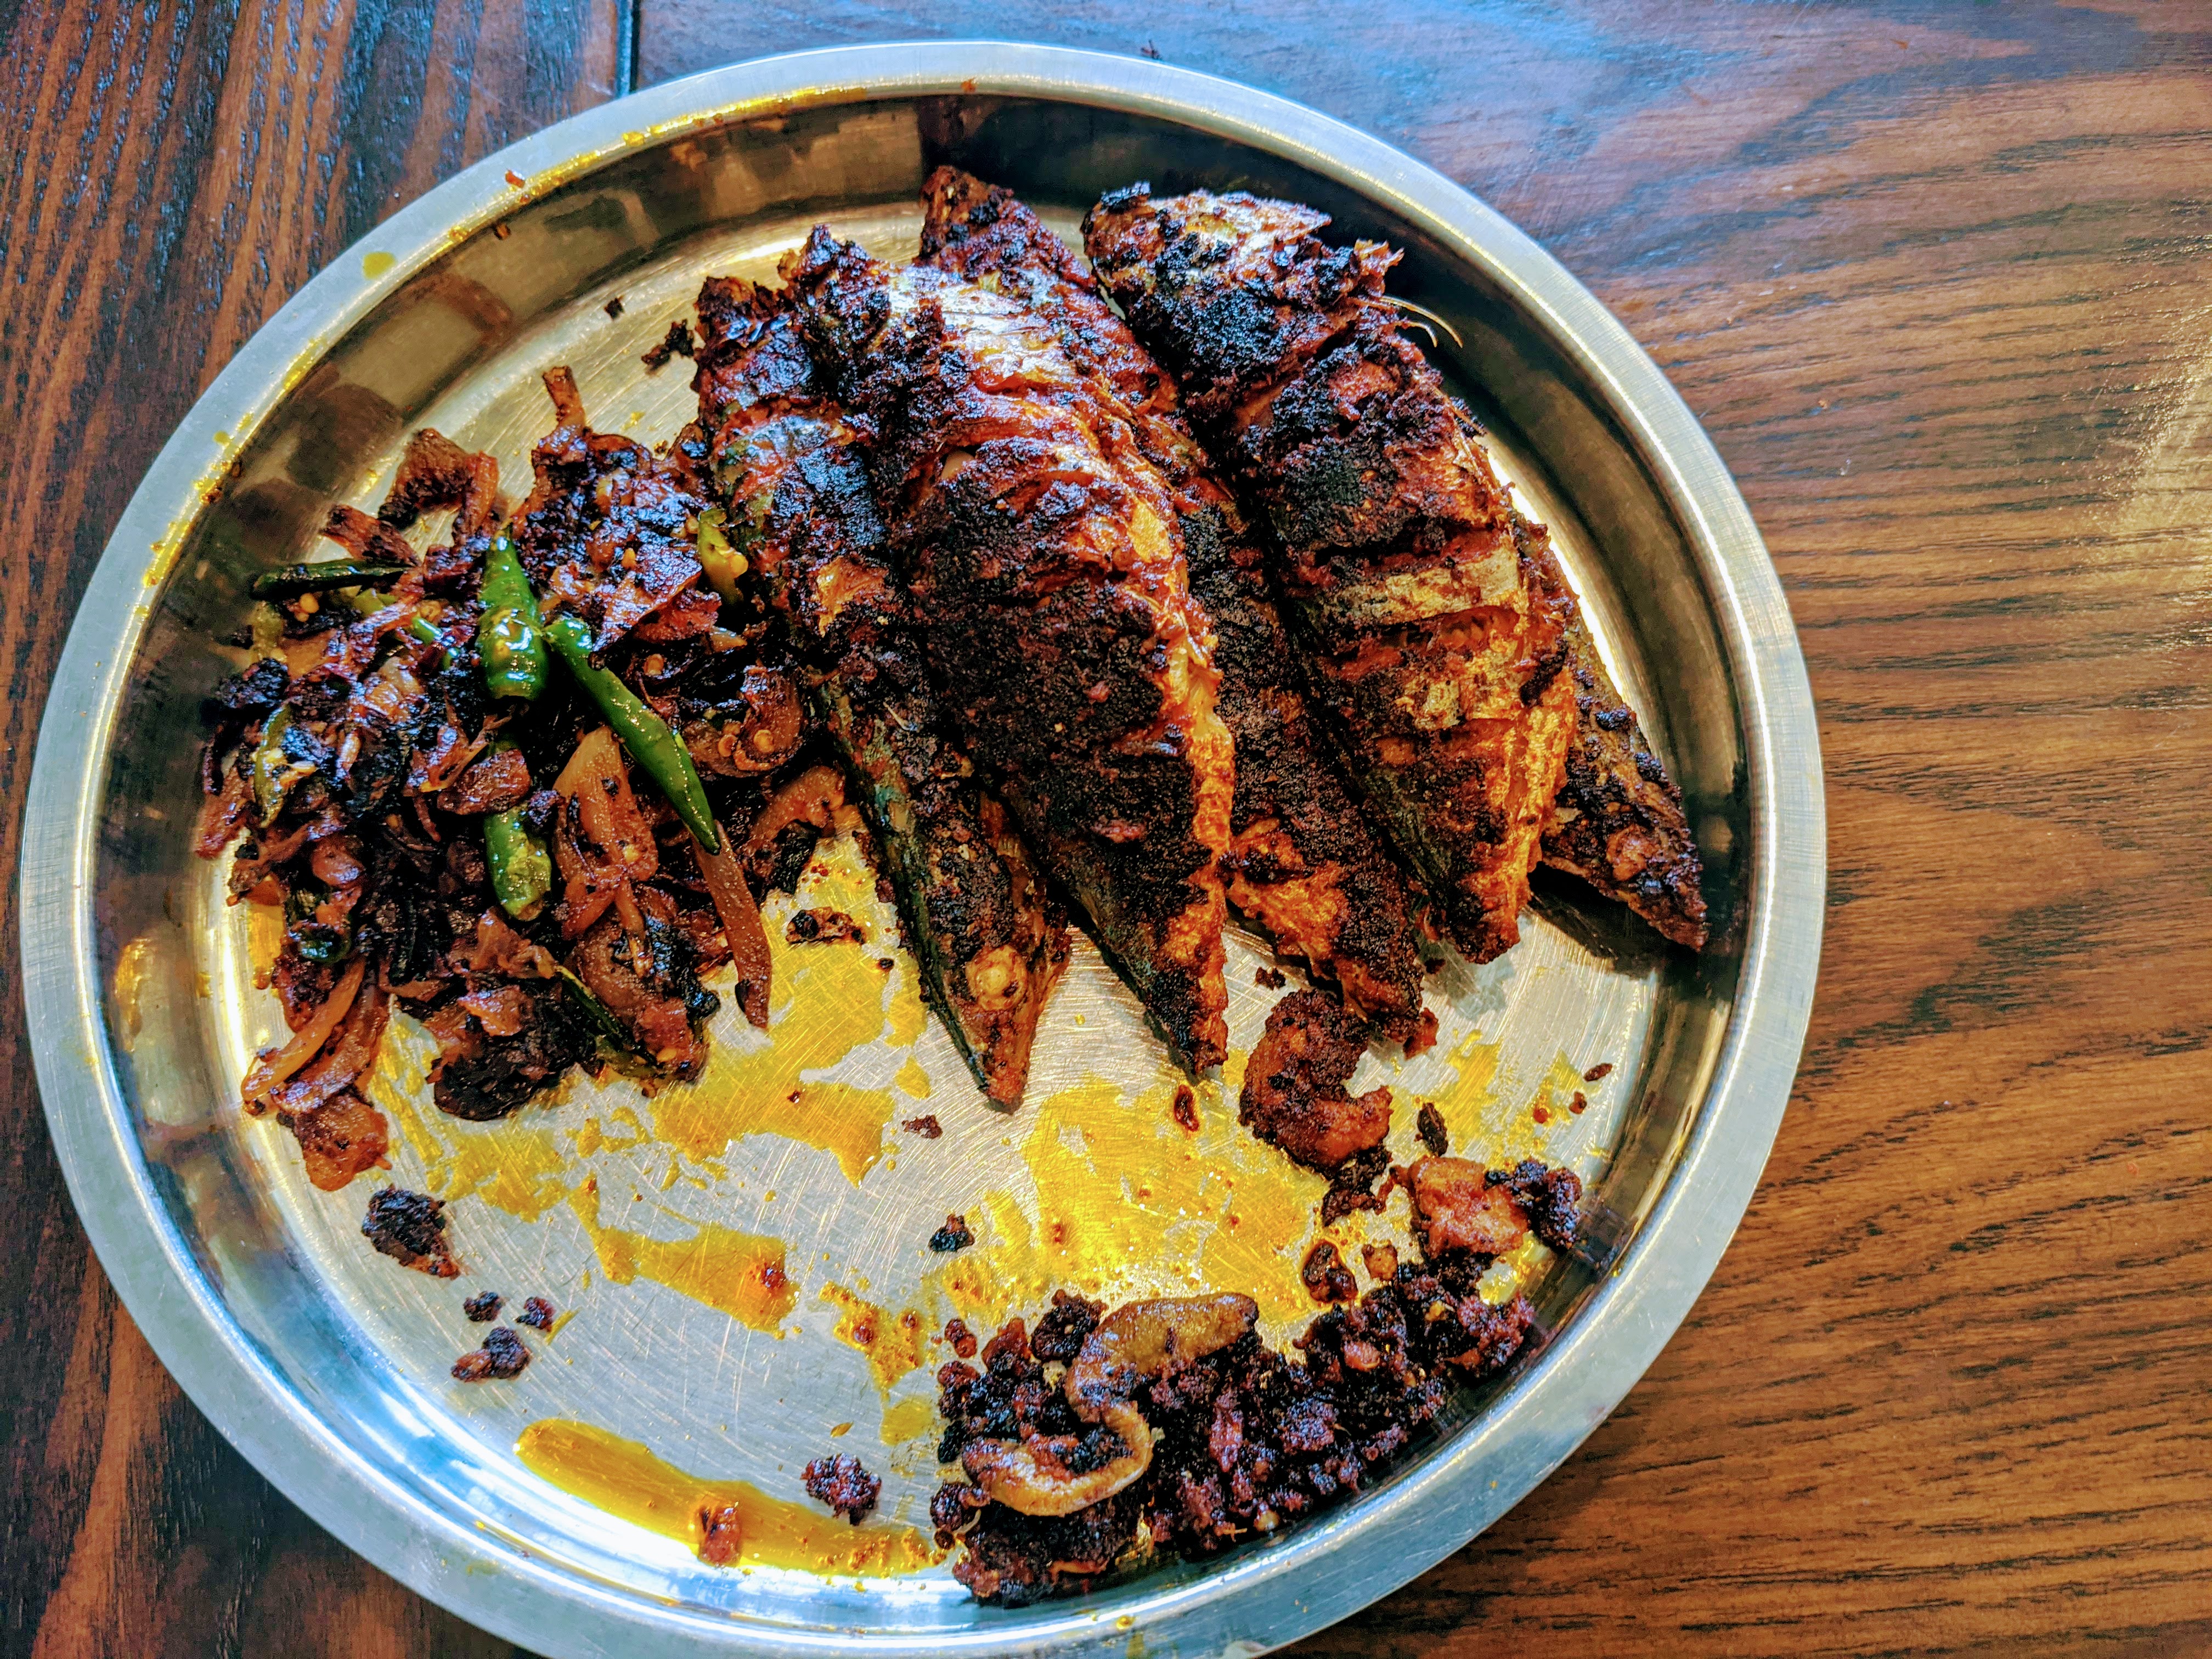
After plating the fish add the lightly fried onion green chili, curry leaf mixture on top. I have few pictures below of few fish fry at home with king fish, lady fish, anchovies, mackerel, pearl spot, tilapia.
Enjoy the aromatic fish fry. Hope it fills your soul. It goes well with pulissery choru combo or just pacha choru :). I know every keralite can relate to this and a staple at our home.
There are many eateries that serve the fish fry combo that I mentioned above in Kerala. The best one that i enjoyed is at Odhens Kannur. The fresh fish makes it the best along with the rasa koottu.
Above picture is a re-creation of odhens feeling for my daughter on her birthday. I think that made her day 🙂 and for sure it filled me with happiness to just serve her and see her face lit :).
I do not know how and when the craze for biriyani started. When I think of biriyani, I get so excited and makes my life so beautiful with out even tasting it. I get the feeling of this excitement to make one and see the happy faces enjoying it and myself too :). My amma never made biriyani. She could not digest the fact of mixing gravy with rice and of course the ghee smell that she could not tolerate. Sadly biriyani never came home.
The biriyani that I remember in my early years is the one from Hotel Soft in Kannur next to my college, that I used to visit with my friends. One of the best biriyani spot at that time and their parotta and butter chicken is awesome too.
After my marriage I landed in Vatakara, closer to Calicut, which is know as heart and soul of Malabar food. My husband’s aunt is an awesome cook. She enjoyed cooking and serving. After marriage during salkaram, we had a day with them and got to see her cook biriyani and this is her recipe adapted to what we have where I stay now :). Hope this recipe gives you the hearty feeling that you have while having a malabar dum biriyani.
All amounts as required for your taste. This is a spicy version.
Ingredients
For Cooking rice: • Biriyani Rice ( Jeera Samba/Kali Jeera preferred to match biriyani rice that we get in Kerala) – 5 cups • Karuvappatta(Cinnamon) -2-3inch piece • Gramboo(Cloves) – 5-6 • Bayleaves – 4 pieces • Cardomom -5 pieces to rice • Oil – 2tbsp – To make rice stay separate • Lemon- 1 -To make rice stay separate. • Water – 9.5 cups • Salt – as required, the water should be salty when you mix everything for rice.
Fish Masala: • Fish (Tilapia/Salmon/Pomfret/King Fish) – I use fillets of tilapia to avoid bones. 1 packets of Costco fillet. Or around 10- 15 pieces of any above fish. • Onion – 5 medium ones • Tomato – 1 medium • Garlic – 2 bulbs • ginger – 4 -5 inches of ginger • green chillies – 20 • cilantro – 1 1/2 bunch • Mint leaves – 1/2 bunch • curry leaves – 4 to 5 sprigs • Garam Masala -(Mix of karuvappatta -2-3inch piece – gramboo–8-9 bayleaves- 4 pieces cardomom- 5 dry roasted and ground) • 1-2 spoon youghurt • Oil – Enough to saute. • Salt as needed • Chili powder and salt for marinating fish as needed.
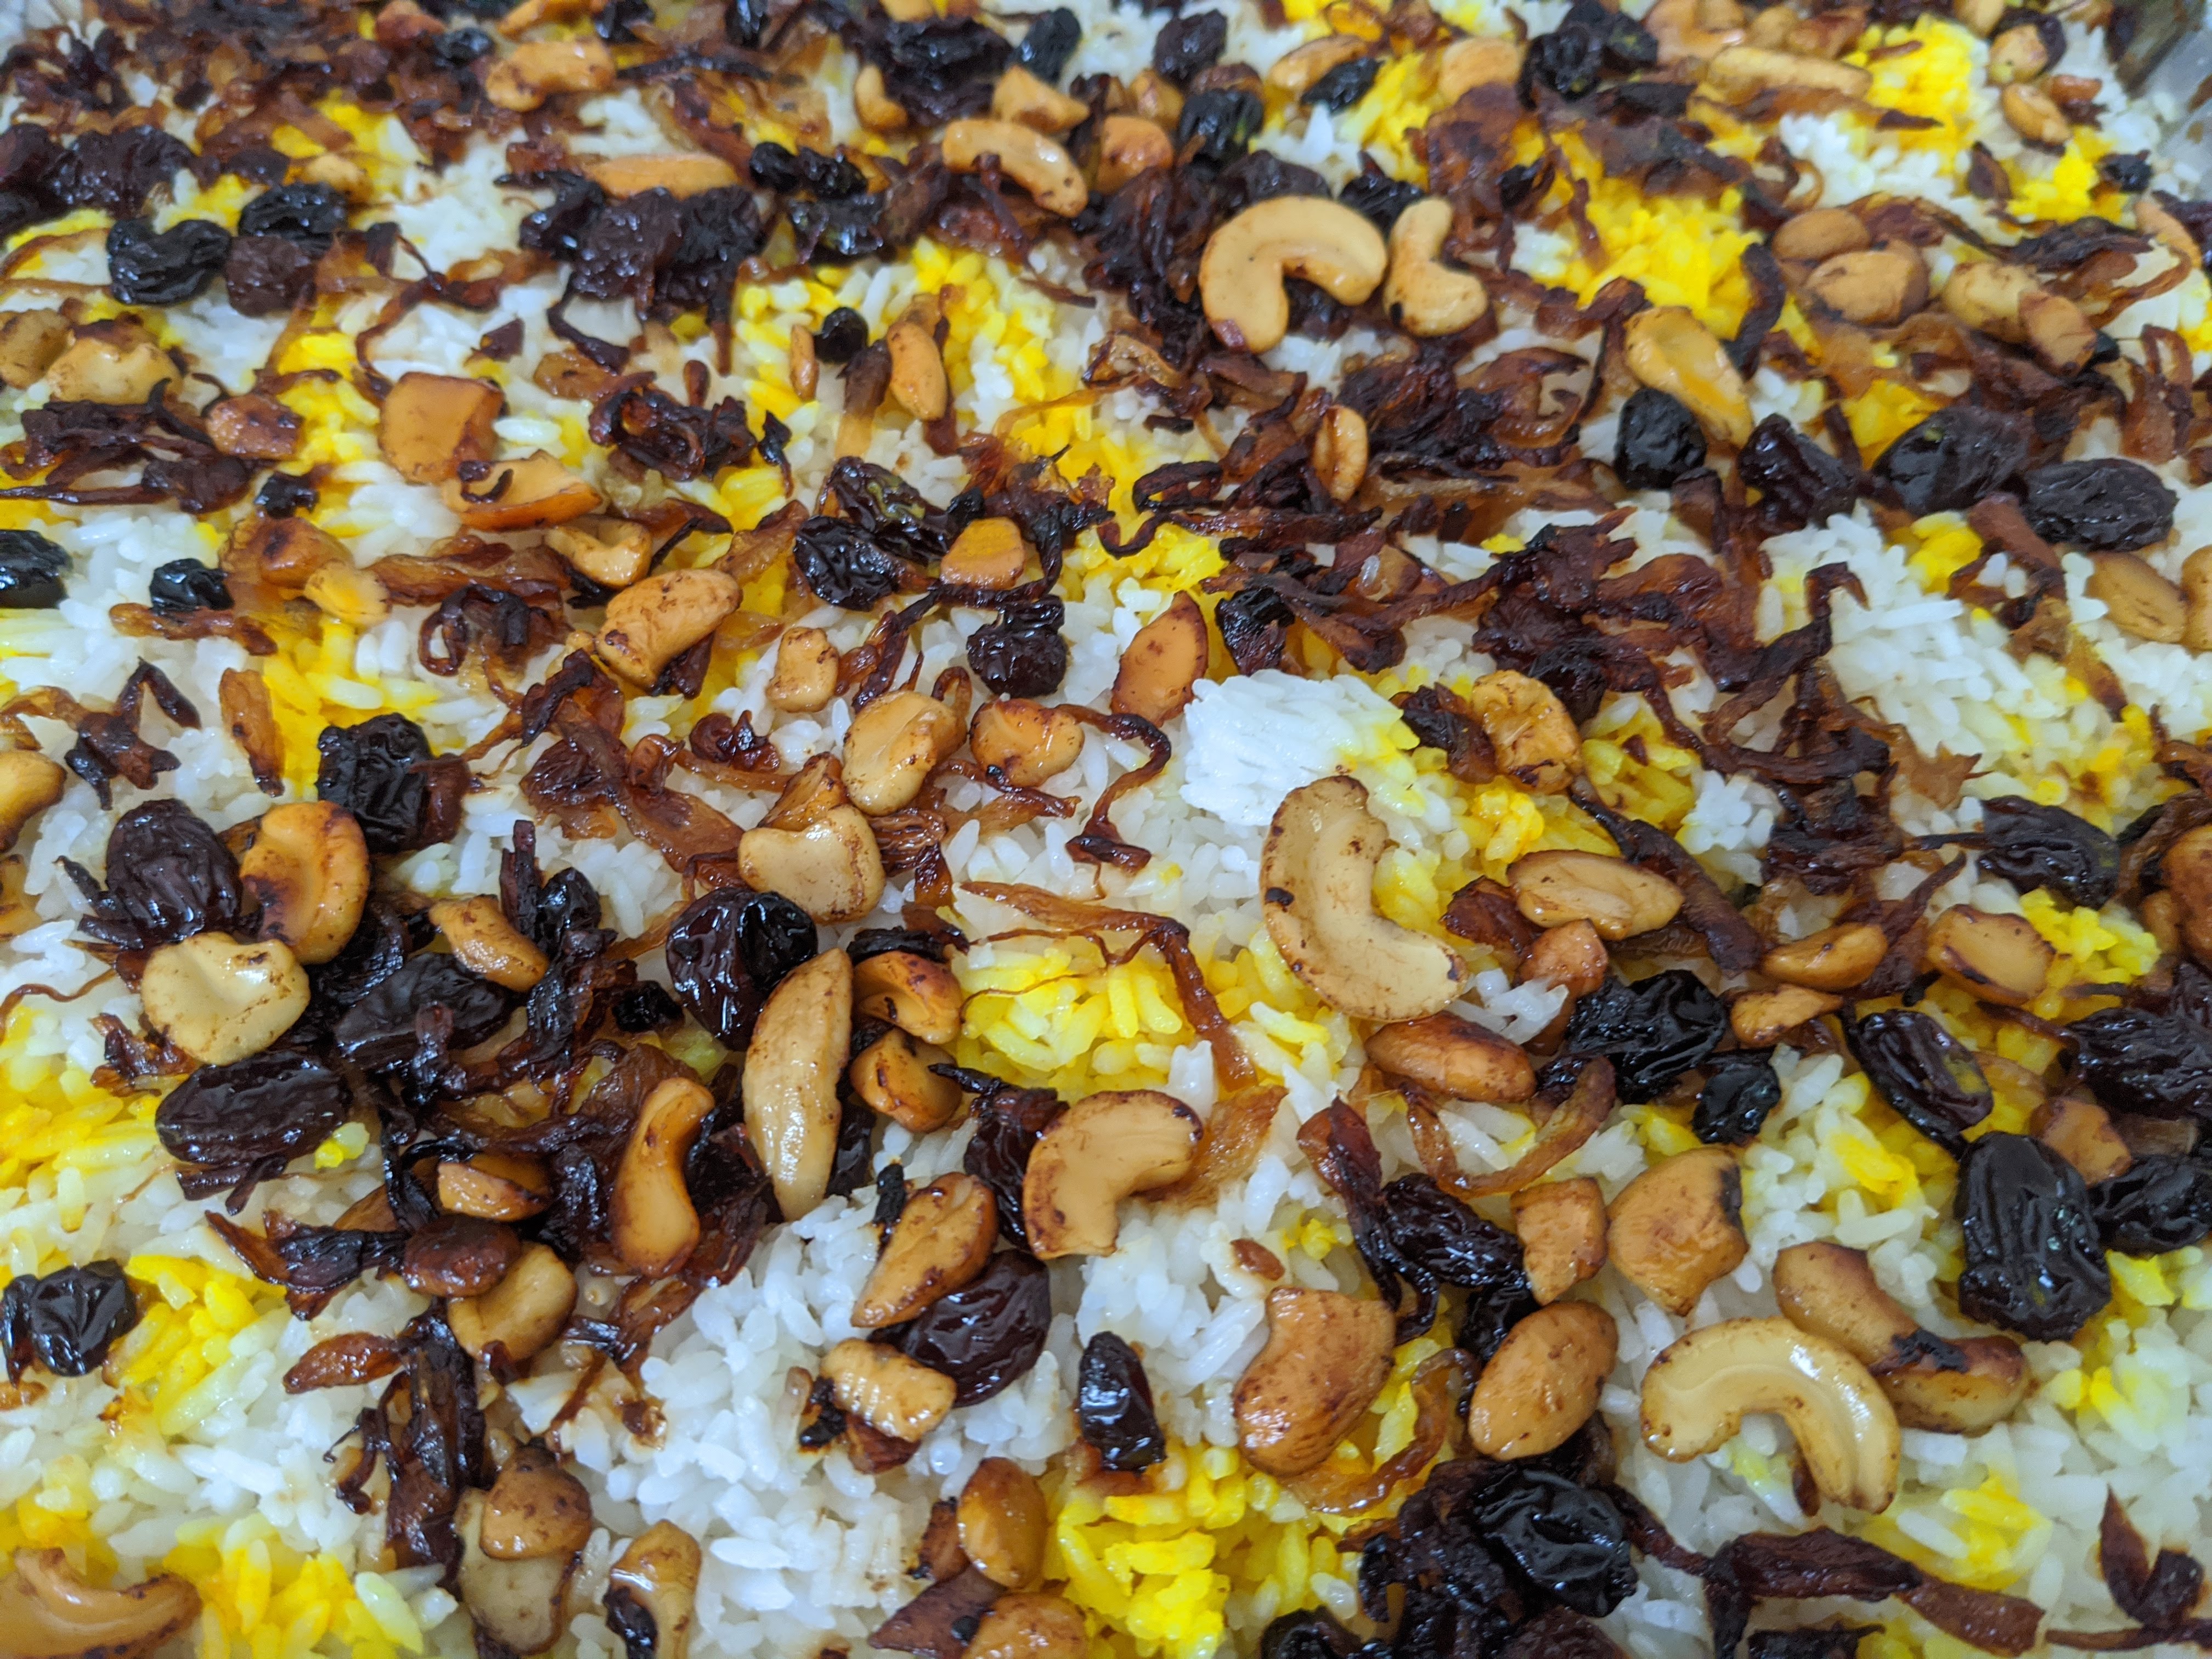
For Garnish: • Onions- 2 onions cut into very thin slices to be fried to golden color • Cashews – 15- 20 pieces • Raisins – Around same amount as cashews • Oil to fry onions • Saffron – few strands soaked in milk to provide dashes of yellow color to the rice. • 1/4 cup of milk. • Ghee – To fry cashews and raisins
Instructions • Rice and fish masala can be prepped in parallel.
Rice:
First soak rice for 10-20mins.
I use rice cooker with 1/2 cup less than the double amount of water. So for 5 cups, 9.5 cups of water.
Add all the ingredients mentioned under the section for rice and cook it right.
If in pressure cooker once hot enough, sauté rice with all dry garam masala in cooker in some oil and add the amount of water specified above with salt, lemon and close it but do not put weight.
Just close the pressure valve with a glass to cover and leave it for 10 minutes in medium flame. After 10 minutes switch off and wait for some time to open and rice should be ready :).
Fish masala:
Marinate fish with salt, chili powder and turmeric for an hour or 30 minutes will be preferred.
Shallow fry the fish lightly and keep it aside.
Sauté the cut onions mentioned for fish.
Meanwhile crush ginger garlic and green chilies and keep it aside.
Chop Cilantro and mint leaves and keep it aside.
Once sautéed well add the crushed ginger garlic green chilly mix and sauté until the raw smell is gone and well blended with the onions.
(add enough ginger garlic green chili of the mix since when rice and gravy gets together masala should be still strong).
Once raw smell is gone, add tomato and sauté well.
Add turmeric powder.
Let all get mixed well and come to that gravy consistency for the biriyani and tastes good.
If needed add some hot water to get into a thick gravy.
If anything looks less like ginger, garlic, green chilli add as you feel.
Finally add the chopped cilantro, mint and curry leaves and leave for few minutes.
Add the grounded garam masala and 1 spoon yoghurt and mix it and switch of the stove.
Prep garnish: • Fry onion in oil for garnish to golden color. • Fry cashews and raisins in ghee. • Once it is already get the biriyani pot or aluminum tray for layering.
Layering and dum process:
Add a layer of cooked rice.
On top of that layer sprinkle fried onions and a little bit of fried cashews and raisins.
Place the rest of the fried fish evenly and spread the gravy evenly on top of it.
Layer the rest of the rice and sprinkle the saffron mixed milk to provide dashes of yellow color to the rice.
Sprinkle fried onions and fried cashews and raisins evenly on the layer. If you have more than one layer repeat this process.
If you have oven cover with aluminum foil tightly and bake for 30 minutes at 300 degree Fahrenheit.
If no oven no worries, we can prepare in our pressure cooker or many prefer cooking straight on the stove in a pot too. We can get the dum effect on top of the stove by keeping a cast iron pan and heat well. Place the biriyani pot on top of that seal the lid with the chapathi dough. If we can get some hot charcoal place it above the lid.
After 30 minutes your yummy biriyani is ready for you to gorge in. Try it with mint chutney, beet root pickle, dates pickle or lemon pickle and a pappadam 🙂
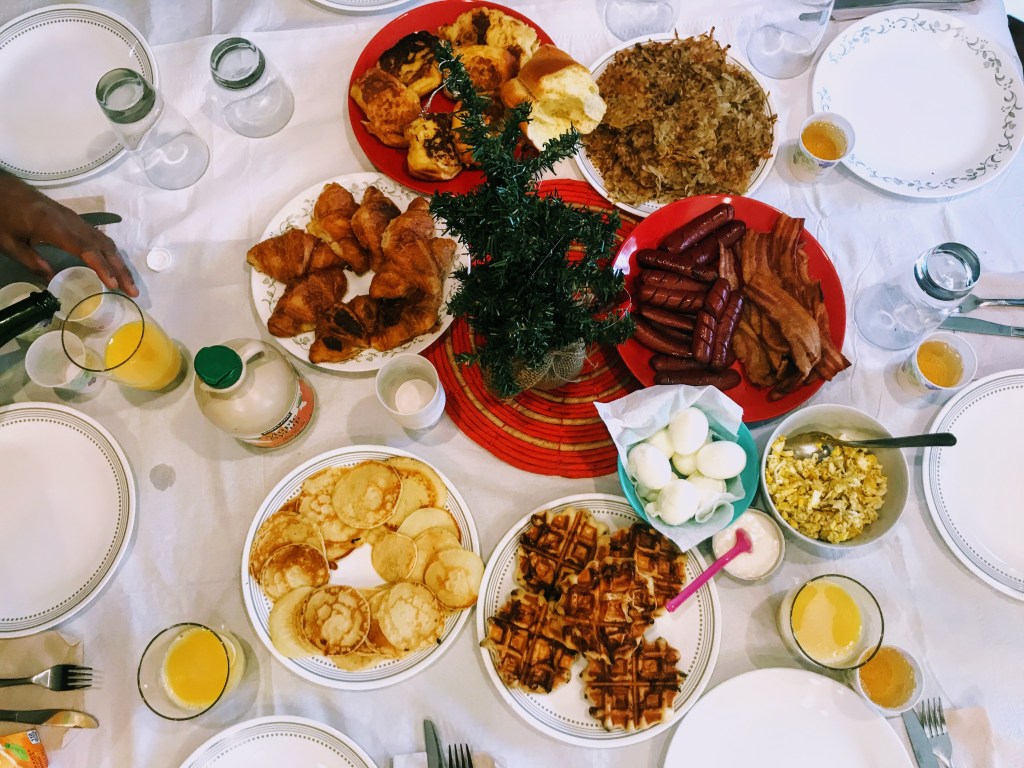
December 25th, 2017 was an exciting day, why not right? It was Christmas and our friends were visiting. I woke up early and came running down to prep breakfast, but to my surprise I was blocked on the way to the kitchen. My daughter, husband, and friend’s husband were running around in MY territory, screaming, ” STOP! Do not ruin the surprise.” Looks like my daughter had hired two sous chef and the only thing missing was their chef caps.
After a long wait, we were finally invited to have the prestigious breakfast painstakingly prepared by our world-class chefs. It was beautifully laid out like a painting on a canvas, and truly perfect: A surprise breakfast, which we loved. I had to do no cooking, and I know if I was allowed in the kitchen, I would have annoyed my daughter to no end.
All these items might be familiar to you but I would like to present two of them that made my mind feel full. Two reasons – both are quick fix, but very gourmet and tasty.
Cinnamon Waffle
Most of us are fan of pillsburry cinnamon rolls, get 1 can (17.5 oz) Pillsbury™ Grands which is refrigerated.
While waffle maker is set to heat, open the can and separate the dough into rolls.
Place the dough in the center of waffle maker. Bake until waffle is thoroughly cooked and golden brown.
Your choice of toppings :), we were served with maple syrup and an extravagant cream cheese topping.
French Toast with Apple filling
Apple Filling
Butter 1/4 cup.
Ground Cinnamon – 1/4 tsp
Brown Sugar – 1 tsp
Apples any kind (granny smith works better with the crunch) – 1 cup sliced.
Salt – a pinch
In a medium skillet over medium heat, melt butter. Add brown sugar, cinnamon and salt, and stir to combine.
Add apples and cook until apples are tender and sugar is dissolved and syrupy, 8 to 10 minutes. Stir often.
French Toast
thick slices brioche – 4-5 slices
milk – 1 cup
large eggs – 2
pure vanilla extract- 1 tbsp
butter – 1/3 cup
cinnamon sugar – mix of 1 tbsp of ground cinnamon and 1 cup of sugar.
Bread crumbs – 1 cup to roll the bread.
whipped cream, for serving
Give a small cut each slice of brioche to stuff the apple mixture and fill it enough.
Whisk eggs, milk, and vanilla until combined in a shallow dish. Dip each slice bread until fully soaked.
Mix bread crumbs with cinnamon sugar in a plate. Roll the batter dipped bread in to the bread crumb mixture and it is ready to go on stove.
In a large iron skillet over medium-low heat, melt butter. Cook each slice of bread for 2-3 minutes until its golden brown.
Serve it with whipped cream and a dash of cinnamon sugar.
Hope these dishes churn some emotions in you. It comes from cooking, serving, and enjoying your dishes, for sure our attitude during the process impact the emotions that we go through while enjoying it.
Have a great time with these dishes, and enjoy the rest of your day.
This blog was initially created for my cooking expeditions in 2010 when I was dreaming of building a restaurant with my 6 year old son, but it was never published.
This love for food has been there as long as I can remember. My amma(mom) says nothing stayed in my tummy when I was a baby but when I finally accepted her food, I couldn’t get enough of it. Since then, food has been my best buddy or even my first love. I think this chapter of my life is repeating with my daughter and hence my motivation to start blogging again.
I wanted it to be not just for cooking, hence the name, All Good Times!! A place to scribble all the good times to keep me positive, which I hope will keep you moving and driven.